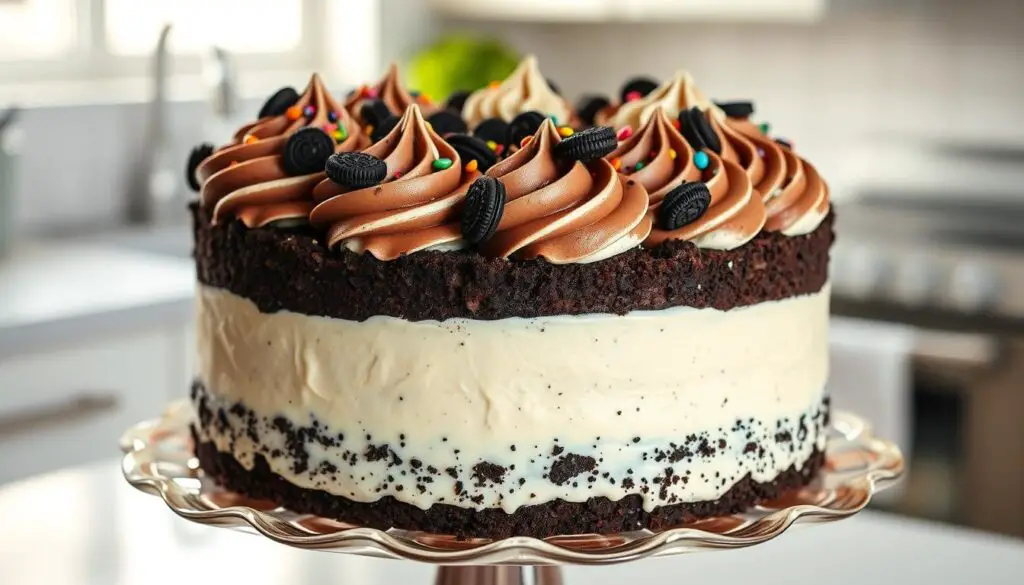
As the sun sets, it casts a warm glow over the backyard. The sound of laughter and chatter fills the air. It’s the perfect summer evening, and a sweet treat is just what it needs. An ice cream cake with oreo crust is the perfect choice. It has a crunchy cookie crust and creamy ice cream. It’s a treat that everyone will love.
Making an Oreo ice cream cake might seem hard, but I’m here to help. With simple ingredients and some freezer time, you can make a dessert everyone will love. Let’s start making the perfect homemade ice cream cake with an Oreo crust.
Why Make a Homemade Oreo Ice Cream Cake
Making your own Oreo ice cream cake has many benefits. It’s cheaper and you can make it your own. It’s great for summer parties or holidays.
Benefits of Making Your Own Ice Cream Cake
When you make your own Oreo ice cream cake, you can change it to fit your taste. You can try new ice cream flavors or add toppings. You’ll also know it’s made with fresh, quality ingredients.
Cost-Effective vs. Store-Bought Options
Homemade Oreo ice cream cakes are cheaper than store-bought ones. You can pick the ingredients and how much to use. This way, you can make a tasty treat without spending a lot. Plus, you’ll get to show off your cooking skills and impress your guests.
Customization Possibilities
One of the best things about making your own Oreo ice cream cake is you can customize it. You can choose the cookie crust, ice cream flavors, and toppings. It’s perfect for any party or special event.
Essential Ingredients and Equipment Needed

To make a perfect Oreo ice cream cake, you need a few things. You’ll need Oreo cookies, unsalted butter, cookies and cream ice cream, hot fudge sauce, and whipped cream. You also need a 9×13 inch pan or a springform pan, a food processor or blender, a spatula, and plastic wrap or foil.
The Oreo cookie crust is key. You’ll need about 24 Oreo cookies and 1/2 cup of melted unsalted butter. This makes the crust taste great and feel right.
For the chocolate Oreo ice cream layer, use 1 liter (1 quart) of your favorite Oreo ice cream. Add 2 tablespoons of warmed hot fudge or chocolate sauce.
To finish it off, you’ll need 10 crushed Oreo cookies and 1/2 cup of thick, warmed hot fudge sauce. The top layer needs another 1 liter (1 quart) of softened Oreo ice cream. You can top it with whipped cream, chocolate sauce, and extra Oreo cookies.
| Ingredient | Quantity |
|---|---|
| Oreo Cookies | 54 cookies (24 for crust, 10 for topping, 20 for garnish) |
| Unsalted Butter | 1/2 cup, melted |
| Cookies and Cream Ice Cream | 2 liters (2 quarts) total |
| Hot Fudge Sauce | 1/2 cup, warmed |
| Whipped Cream | As desired for topping |
With these ingredients and tools, you’re ready to make a delicious Oreo ice cream cake. Don’t forget to crush the Oreo cookies for the crust with your food processor or blender.
Creating the Perfect Oreo Cookie Crust Base
Making a tasty Oreo cookie crust is key for your ice cream cake. The right way to crush cookies and mix with butter is crucial. Let’s look at how to make a crunchy base that makes your dessert amazing.
Crushing Techniques for Optimal Texture
Start by getting your Oreo cookies ready. Choose the best way to crush them into fine crumbs. A food processor works best for a smooth texture. Or, you can use a rolling pin in a plastic bag to crush them.
Butter-to-Cookie Ratio Tips
After crushing your Oreos, mix in the right amount of melted butter. Use 6 tablespoons of butter for each package of Oreos. This makes a crust that’s not too greasy but still crunchy. The mix of Oreo cookie crumbs and butter is perfect for your ice cream cake base.
Proper Crust Pressing Methods
To make the crust, press the Oreo-butter mix firmly into your pan. Use a measuring cup or glass to pack it down evenly. After pressing, freeze it for 15 minutes to set before adding ice cream.
Choosing the Right Ice Cream Flavors
When making your homemade Oreo ice cream cake, you can pick from many ice cream flavors. The classic cookies and cream ice cream is always a hit. But, feel free to try other tasty options too.
Think about using chocolate chip cookie dough or mint chocolate chip ice cream. These flavors go great with the Oreo crust. They can make your ice cream cake even better. If some guests have dietary needs, you can choose dairy-free ice cream.
Make sure to soften the ice cream for 10-15 minutes before using it. This makes it easier to spread over the Oreo crust. It helps create a smooth, even layer in your cake.
| Ice Cream Flavor | Tasting Notes |
|---|---|
| Cookies and Cream | The traditional choice, featuring chunks of Oreo cookies throughout the ice cream. |
| Chocolate Chip Cookie Dough | A decadent option with chunks of chocolate chip cookie dough in a rich chocolate ice cream base. |
| Mint Chocolate Chip | A refreshing blend of cool mint and semisweet chocolate chips for a tasty contrast. |
Remember, pick ice cream flavors that you and your guests will love. Feel free to be creative and try different combinations. This way, you can find the perfect ice cream cake for your next event.
Step-by-Step Guide to Ice Cream Cake with Oreo Crust
Making an ice cream cake with Oreo crust is simple. Just follow these steps to make a dessert that looks great and tastes amazing. It will wow your family and friends.
Preparation Steps
- Begin by making the Oreo crust. Crush 24 Oreo cookies in a food processor or with a rolling pin in a bag. Mix the crushed cookies with ¼ cup of melted unsalted butter until well combined.
- Press the Oreo mixture into the bottom of a springform pan. Make sure it’s even. Place the crust in the freezer for 10-15 minutes to set.
Assembly Process
After the crust is set, add the ice cream layers. Spread 1.5 liters of softened vanilla ice cream over the Oreo crust. Then, add 1.5 liters of Oreo-flavored ice cream. Freeze the cake for at least 1 hour to firm up.
Freezing Instructions
- After the ice cream layers freeze, add a 1 cup layer of whipped cream on top. Sprinkle with more crushed Oreo cookies for garnish.
- Return the cake to the freezer for another hour or until the topping is set.
- Once fully frozen, the cake can be stored in the freezer for up to 2-3 weeks. Take it out 10-15 minutes before serving for the best texture.
By following these steps, you’ll make a stunning ice cream cake. It will have the perfect mix of creamy ice cream and crunchy Oreo crust. Enjoy your homemade masterpiece!
Adding the Hot Fudge Layer
Make your Oreo ice cream cake even better with a rich hot fudge sauce layer. If you make it yourself, let it cool down first. Spread the 12-14 ounce jar of chocolate fudge over the ice cream. This will make a delicious fudge layer that everyone will love.
To make spreading easy, warm the fudge in the microwave for 15-20 seconds. After spreading, put the cake back in the freezer for an hour. This helps the fudge set well, making your cake look great when you cut it.
Getting the fudge layer just right is key. It should be gooey but also firm. With a bit of care, you’ll make a dessert that everyone will talk about.
Whipped Topping Techniques and Tips
Top your Oreo ice cream cake with a fluffy, creamy whipped topping. You can use Cool Whip from the store or make whipped cream at home. Spread it evenly over the fudge layer with a spatula for a smooth finish.
Spreading Methods
Begin by placing the whipped topping in the cake’s center. Use a spatula to spread it outwards, reaching the edges. Make sure to cover the whole surface. If there are gaps, add more topping and smooth it out.
Decorative Finishes
After spreading the topping, get creative with decorative finishes. Use a piping bag for swirls or peaks. You can also make a wavy texture with a fork. For a special touch, sprinkle crushed Oreo cookies or chocolate shavings on top.
Freeze the cake for at least 30 minutes after adding the topping. This helps the layers set before serving. Your Oreo ice cream cake will stay perfect when you slice it.
Creative Garnishing Ideas
Make your Oreo ice cream cake stand out with fun garnishes. Top it with crushed Oreos for a cookie crunch. Add mini chocolate chips for flavor and texture.
Drizzle chocolate syrup in patterns for a sweet look. It will make the cake look amazing.
For a special touch, add cookie pieces, chocolate shavings, or edible flowers. These not only look good but also taste great. They add variety to your dessert.
Put these toppings on just before you serve. This keeps them fresh and crunchy. With a bit of creativity, your ice cream cake will wow everyone.
| Garnish | Quantity | Purpose |
|---|---|---|
| Crushed Oreos | 1/2 cup | Adds classic cookie crunch |
| Mini chocolate chips | 1/4 cup | Provides pops of rich flavor |
| Chocolate syrup | 2 tablespoons | Creates a decadent drizzle |
| Cookie pieces | 1/4 cup | Adds visual interest and texture |
| Edible flowers | 6-8 flowers | Enhances presentation for special occasions |
Having fun with garnishes is key to a stunning Oreo ice cream cake. Try different things to find the perfect mix of flavors and textures. Your guests will be amazed.
Storage and Freezing Guidelines
To keep your Oreo ice cream cake fresh and tasty, proper storage is crucial. Once it’s ready, store it in an airtight, freezer-safe container. This prevents freezer burn and keeps it good for a long time.
Proper Wrapping Techniques
Wrap the cake tightly in plastic wrap or aluminum foil. Press down to get rid of air pockets. This makes a tight seal and keeps the cake moist and flavorful.
You can also use a resealable freezer-safe bag. Squeeze out air before sealing to keep it fresh.
Temperature Recommendations
For the best freezer storage, keep the cake at 0°F or below. This stops freezer burn and keeps the cake creamy and tasty for up to a month. Make sure you have enough freezer space before making your cake.
By following these easy storage and freezing tips, you can enjoy your homemade Oreo ice cream cake for a long time. Treat yourself to this rich dessert whenever you want!
Professional Tips for Slicing and Serving
Serving a delicious ice cream cake needs some skill. To get it right, follow these expert tips:
- Take the cake out of the freezer 5-10 minutes before you serve it. This makes it easier to cut.
- Use a sharp, serrated knife that’s been dipped in hot water. This will help you get clean, precise slices.
- Cut the cake into 16-20 pieces. This makes 4 rows with 4-5 slices in each. It ensures everyone gets a good-sized piece.
- Always serve the cake right away to stop it from melting. If there’s leftover, put it in an airtight container in the freezer.
By using these tips, your ice cream cake will be perfectly sliced and served. Your guests will love it and want more.

Troubleshooting Common Issues
Making a perfect ice cream cake with an Oreo crust can be fun. But, it comes with its own set of problems. Don’t worry, we’ve got some tips to help you make it perfect every time.
Preventing Ice Crystals
Ice crystals in your ice cream cake are a common issue. To avoid them, freeze each layer completely before adding the next. Make sure to let the ice cream freeze well, and if it starts to melt, put it back in the freezer for a few minutes.
Fixing Uneven Layers
If your ice cream layers look uneven, there’s a simple solution. Let the ice cream soften a bit, then use a spatula to even it out. Work fast, as you don’t want it to get too soft. A little patience and care can make your slices even and perfect.
By using these troubleshooting tips, you’ll get better at making ice cream cakes with an Oreo crust. With practice and attention to detail, you’ll soon be serving perfect slices of ice cream cake!
Variations and Flavor Combinations
Ice cream cakes are a fun way to try new flavors. You can go beyond the usual Oreo crust. Try mint chocolate chip, chocolate fudge brownie, or coffee ice cream for a twist.
Want a vegan option? Use dairy-free ice cream and vegan chocolate sauce. You can also use plant-based whipped topping. This way, you can make your ice cream cake fit your diet or taste.
Want something different? Add chopped nuts or crushed candy bars to your cake. Swirl in fruit preserves or fresh berries for a nice mix of flavors.
| Flavor Combination | Ingredients |
|---|---|
| Mint Chocolate Chip | Mint chocolate chip ice cream, Oreo crust, chocolate shavings |
| Chocolate Fudge Brownie | Chocolate fudge brownie ice cream, Oreo crust, hot fudge sauce |
| Cookies and Cream | Cookies and cream ice cream, Oreo crust, crushed Oreo cookies |
| Strawberry Cheesecake | Strawberry cheesecake ice cream, Oreo crust, fresh strawberries |
Homemade ice cream cakes let you be creative. Mix different ice cream flavors, toppings, and textures. This way, you can make a dessert that’s both unique and delicious.
Make-Ahead Tips and Party Planning
Hosting a party? A delicious Oreo Ice Cream Cake is perfect. You can make it 1-2 days early. This lets you focus on other party details [https://confessionsofabakingqueen.com/cookies-cream-ice-cream-cake/]. Just put it together, freeze it, and chill it until serving time.
For big parties, make several small cakes with different flavors. This way, you have enough for everyone. You can try flavors like vanilla, chocolate, strawberry, or mint chocolate chip. The choices are endless for customizing your cake.
This dessert is great for summer events like barbecues, birthdays, or holidays. Its make-ahead feature and tasty flavors make it a hit. Your Oreo Ice Cream Cake will be the main attraction.
- Build the cake 1-2 days before and freeze it until you’re ready to serve.
- Make several small cakes in different flavors for big parties.
- Wrap the cake well in the freezer to avoid freezer burn.
- Let the cake thaw at room temperature for 15-20 minutes before cutting and serving.
With some planning, your homemade Oreo Ice Cream Cake will be the best make-ahead dessert. It will wow your guests and have them asking for more.
Conclusion
Making a homemade Oreo ice cream cake is a fun and rewarding task. It’s perfect for any time of the year. The cake has layers of crunchy Oreo crust, creamy ice cream, rich fudge, and fluffy whipped topping.
This dessert is great for any event, like a backyard barbecue or a special celebration. It’s also perfect for when you just want something delicious. The mix of Oreo flavor and cool ice cream is irresistible.
Try making this cake and see how much fun it is. With the right ingredients and a bit of effort, you’ll make a dessert that everyone will love. It’s a summer treat that will impress your guests. Enjoy!

FAQ
What are the key ingredients needed to make a homemade Oreo ice cream cake?
You’ll need Oreos, unsalted butter, cookies and cream ice cream, hot fudge sauce, and whipped cream.
What equipment is required to make an Oreo ice cream cake?
You’ll need a 9×13 inch pan or springform pan, a food processor or blender, a spatula, and plastic wrap or foil for covering the cake between layers.
How do I create the Oreo cookie crust?
Crush Oreos into fine crumbs using a food processor or plastic bag and rolling pin. Mix the crumbs with 6 tbsp of melted butter. Press the mixture firmly into the pan.
Can I use different ice cream flavors besides cookies and cream?
Yes! Try flavors like chocolate chip cookie dough or mint chocolate chip. Dairy-free options are also good for those with allergies.
How do I assemble the ice cream cake layers?
First, prepare the Oreo crust and freeze it. Then, spread softened ice cream over the crust and freeze for 1 hour. Add hot fudge sauce and freeze for another hour.
Top with whipped cream and crushed Oreos. Freeze for at least 3-4 hours or overnight.
How do I store the Oreo ice cream cake?
Store it in an airtight, freezer-safe container to prevent freezer burn. Keep it in the freezer at all times. It can be stored for up to 1 month.
How do I slice and serve the Oreo ice cream cake?
Remove the cake from the freezer 5-10 minutes before serving. Use a sharp knife dipped in hot water for clean cuts. Cut into 16-20 servings.
Make 4 rows with 4-5 pieces in each row. Serve immediately to prevent melting.
How can I troubleshoot common issues with the Oreo ice cream cake?
To prevent ice crystals, freeze each layer completely before adding the next. For uneven layers, let the ice cream soften slightly and smooth it out with a spatula.
If layers are melting too quickly, return the cake to the freezer for a few minutes between steps.


