📑 Table of Contents ▶
- The Base of Your Dessert: Oreo No-Bake Cheesecake Cups
- Fundamentals
- Preparation/Setup
- Directions
- Getting Creative with Oreo No-Bake Cheesecake Cups
- Technique
- Tips/Tricks
- Enhancing Your Oreo No-Bake Cheesecake Cups
- Perfecting Results
- Troubleshooting/Variations
- Presenting Your Oreo No-Bake Cheesecake Cups
- Serving/Presentation
- Pairings/Storage
- Have you tried this recipe?
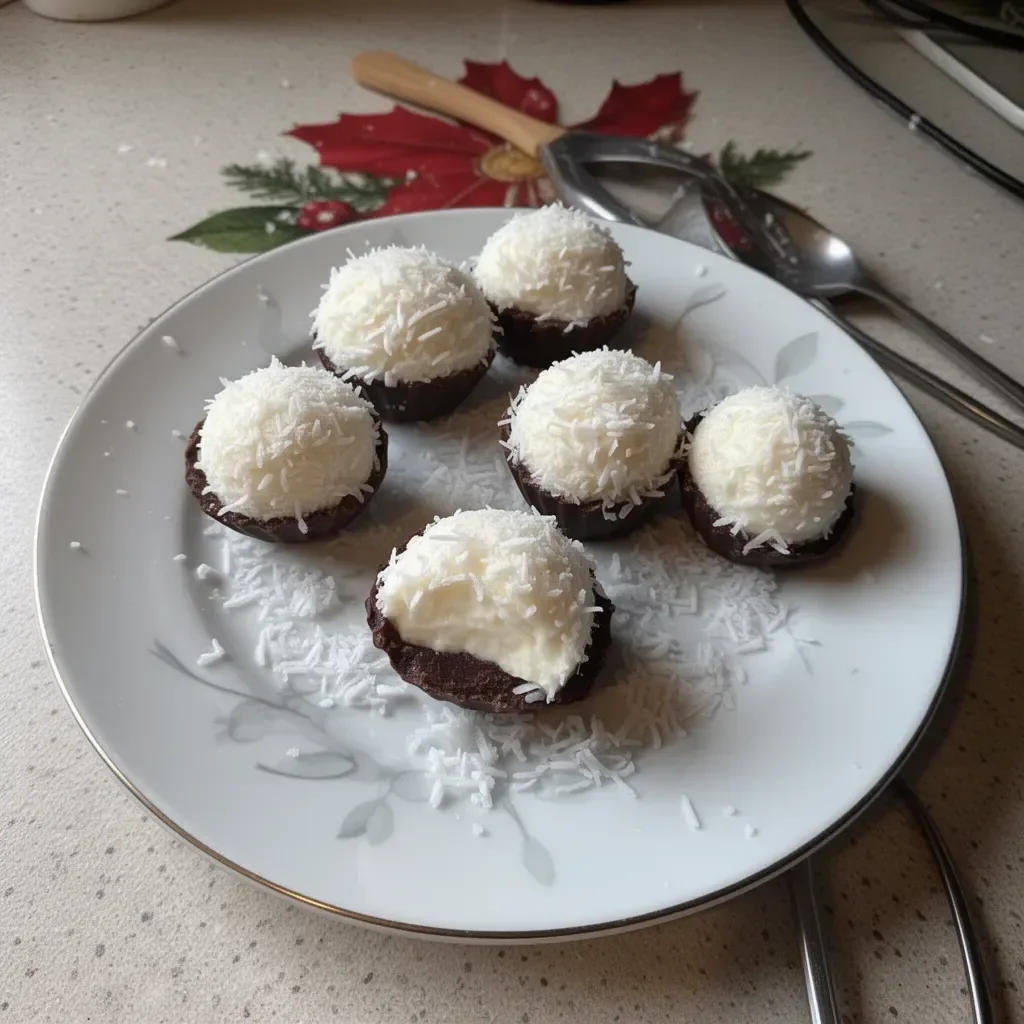
Oreo No-Bake Cheesecake Cups
Creating desserts often brings back fond memories, especially when it involves a treat as delightful as Oreo No-Bake Cheesecake Cups. Imagine sitting in your childhood kitchen, the enticing aroma of chocolate wafting through the air. You’ve set up a small production line with your favorite cookies and a tub of fluffy whipped topping, excitedly preparing these delightful treats with friends or family. The anticipation builds as you layer creamy cheesecake filling over a crunchy Oreo base, a combination that speaks to the joy of cooking.
These delightful cups embody everything fun about dessert preparation. You don’t need to turn on the oven, and there’s something about that easy assembly that turns baking into a joyous experience. Each step feels playful—crushing those Oreos always brings a smile. Plus, they make for perfect individual servings, turning any gathering into a classy affair without much fuss.
⚡ Smart Kitchen Tools Every Home Cook Swears By

- Pure aluminum
- Durable enough for everyday cooking
- Made in the USA with quality

- 7 cooking functions in one compact cooker
- 3-quart size ideal for couples or small meals
- Up to 70% faster than traditional cooking

- 3 sizes for every recipe
- Pre-seasoned & durable cast iron
- Oven & grill ready
As you whip together cream cheese and Cool Whip, that creamy mixture transforms into a luscious filling you can’t wait to dive into. With each bite, you’ll savor the balanced flavors of chocolate, creaminess, and sweetness, all layered beautifully to delight every taste bud.
The Base of Your Dessert: Oreo No-Bake Cheesecake Cups
Fundamentals
The foundation of any dessert often determines the experience. With Oreo No-Bake Cheesecake Cups, this foundation relies heavily on the classic Oreo cookie. Its crunchy texture and rich chocolate flavor create a perfect contrast to the creamy cheesecake layer that follows. Each element of this dessert works in unison to create a delightful treat.
Understanding these fundamentals helps elevate your dessert from simple to extraordinary. Pick quality ingredients; each component plays a pivotal role in the overall flavor and texture. When you start with solid fundamentals, you set the stage for a successful culinary adventure.
Preparation/Setup
To begin making Oreo No-Bake Cheesecake Cups, gather your ingredients: an 8-ounce block of softened cream cheese, an 8-ounce tub of Cool Whip or whipped topping, 2/3 cup powdered sugar, 1 teaspoon vanilla, and 24-26 Oreo cookies. Gather six small dessert dishes, ensuring they can hold at least 3/4 to 1 cup of deliciousness.
Start by crushing the Oreo cookies. Place them inside a plastic bag and seal it tightly. Use a rolling pin or a sturdy wooden spoon to crush the Oreos. Aim for a fine crumb that will serve as the delicious base layer for your cups. Once crushed, spoon 1 1/2 to 2 tablespoons of the crushed Oreos into each dessert dish. Set that aside to begin preparing the cheesecake filling.
Ingredients
Here’s a quick rundown of what you need to make these delightful cups:
- 1 8 oz block of cream cheese, softened
- 1 8 oz. Cool Whip or equivalent whipped topping
- 2/3 cup powdered sugar
- 1 teaspoon vanilla extract
- 24-26 Oreo cookies (you can use more if you desire)
These ingredients create the creamy filling and crunchy base that make Oreo No-Bake Cheesecake Cups an instant favorite.
Directions
Follow these straightforward steps to whip up your delicious desserts:
- Begin by crushing the 24-26 Oreo cookies in a sealed plastic bag using a rolling pin or wooden spoon.
- Spoon 1 1/2 to 2 tablespoons of the crushed Oreos into the bottom of each dessert dish. Set these aside as the base for your cheesecake.
- In a mixing bowl, whip the softened cream cheese and powdered sugar until you achieve a smooth and creamy texture.
- Add the vanilla and continue to beat until it’s well incorporated.
- Gently fold in the Cool Whip, mixing carefully to maintain the fluffiness of the whipped topping.
- Fold in the remaining crushed Oreos, ensuring an even distribution of the cookie throughout the filling.
- Divide the cheesecake filling across your prepared dishes, pressing gently onto the crushed Oreos.
- Chill the Oreo No-Bake Cheesecake Cups for about an hour or until you’re ready to serve.
- Before serving, top with extra whipped cream and crushed Oreos, adding a final touch of indulgence.

Getting Creative with Oreo No-Bake Cheesecake Cups
Technique
Transforming basic ingredients into a mouthwatering Oreo No-Bake Cheesecake requires some technique but doesn’t necessitate culinary expertise. The key lies in folding rather than stirring when incorporating the Cool Whip. This action preserves the lightness of the whipped topping, giving that airy texture you crave in a cheesecake.
In addition, when you crush the Oreos, aim for a mixture of fine crumbs and slightly larger pieces. This variety adds texture to the crust and enhances the overall eating experience by providing a satisfying crunch.

🥗 Fresh, Fast & Foolproof — Upgrades You'll Use Tonight

- Zoodles in seconds
- Heavy-duty, 10 sharp blades
- Keto, paleo & gluten-free friendly

- Meals in ~30 minutes
- 3-Qt — perfect for 1–3 people
- Pressure cook, sauté, steam & more

- Phone alerts & live temp graph
- Hands-off monitoring for smokers
- Perfect doneness, every time
Tips/Tricks
Here are a few tips to ensure your dessert turns out perfectly each time:
-
Softening Cream Cheese: Make sure your cream cheese is adequately softened. It should sit at room temperature for about 15–20 minutes before mixing.
-
Chill Properly: Allowing the cheesecake cups to chill for a sufficient amount of time is critical. This step allows the flavors to meld and the filling to set properly.
-
Extra Indulgence: For added flavor, consider drizzling chocolate or caramel sauce on top before serving. You can also experiment with different toppings, like chopped nuts or sprinkles, for added fun.
-
Oreo Alternatives: Don’t hesitate to swap out Oreos for other cookies if you’re feeling adventurous. Brands like Chocolate Wafers or even homemade cookies can add unique flavors.
Enhancing Your Oreo No-Bake Cheesecake Cups
Perfecting Results
For those aiming to achieve the absolute best results with Oreo No-Bake Cheesecake Cups, consider measuring your ingredients precisely. Accurate measurements can significantly impact both flavor and texture.
Another tip is to pay attention to the cooling process. Properly chilled cheesecake cups truly enhance their taste, making each bite refreshing and decadent. If you notice they’re not setting up as desired, increasing the chill time can help.
Troubleshooting/Variations
Some common hiccups can happen when preparing your no-bake desserts. For instance, if your mixture is too runny, try adding more crushed Oreos into the filling to help absorb excess moisture.
If you want to switch things up, consider adding flavorings like lemon zest or cocoa powder for a different twist. Don’t shy away from creating layered desserts with fruit or chocolate filling variations—let your creativity flow!
Presenting Your Oreo No-Bake Cheesecake Cups
Serving/Presentation
Presentation makes a significant impact, especially when serving desserts. For Oreo No-Bake Cheesecake Cups, consider festive dessert dishes that pop against your dining table. This small choice elevates the overall appeal of your dessert and can delight guests when unveiling your creation.
You can also garnish with crushed Oreos, whipped cream, and maybe even fresh fruit—like raspberries or strawberries—to add color and excitement to the presentation.
Pairings/Storage
Though it’s customary to pair desserts with various beverages, the focus here is solely on the Oreo No-Bake Cheesecake Cups. Serve these delightful treats chilled and be prepared to enjoy the creamy decadence.
Store any leftovers in an airtight container in the refrigerator for up to three days. However, they rarely last long! Generously portioned cups often vanish quickly, leaving your guests wanting more.
Maintaining the joy of creating desserts like Oreo No-Bake Cheesecake Cups can help foster connections, share memories, and inspire others to find their love for cooking. These delicious treats celebrate indulgence and simplicity, making every bite a moment worth savoring.
Print
Oreo No-Bake Cheesecake Cups
- Total Time: 60 minutes
- Yield: 6 servings 1x
- Diet: Vegetarian
Description
Delightful individual servings of creamy cheesecake layered over a crunchy Oreo base, perfect for gatherings.
Ingredients
- 1 8 oz block of cream cheese, softened
- 1 8 oz. Cool Whip or equivalent whipped topping
- 2/3 cup powdered sugar
- 1 teaspoon vanilla extract
- 24–26 Oreo cookies
Instructions
- Begin by crushing the 24-26 Oreo cookies in a sealed plastic bag using a rolling pin or wooden spoon.
- Spoon 1 1/2 to 2 tablespoons of the crushed Oreos into the bottom of each dessert dish.
- In a mixing bowl, whip the softened cream cheese and powdered sugar until smooth and creamy.
- Add the vanilla and continue to beat until well incorporated.
- Gently fold in the Cool Whip, mixing carefully to maintain fluffiness.
- Fold in the remaining crushed Oreos, ensuring even distribution.
- Divide the cheesecake filling across the prepared dishes, pressing gently onto the crushed Oreos.
- Chill the cups for about an hour or until ready to serve.
- Before serving, top with extra whipped cream and crushed Oreos.
Notes
For extra indulgence, consider drizzling chocolate or caramel sauce on top before serving.
- Prep Time: 20 minutes
- Cook Time: 0 minutes
- Category: Dessert
- Method: No-Bake
- Cuisine: American
Nutrition
- Serving Size: 1 serving
- Calories: 290
- Sugar: 18g
- Sodium: 250mg
- Fat: 18g
- Saturated Fat: 10g
- Unsaturated Fat: 6g
- Trans Fat: 0g
- Carbohydrates: 31g
- Fiber: 1g
- Protein: 4g
- Cholesterol: 40mg
Keywords: cheesecake, no-bake, dessert, Oreo, creamy

🍳 Precision Meets Passion — Tools Chefs Trust Daily

- Grams & ounces — precise to 1g
- Perfect for baking & keto tracking
- Sleek stainless steel design

- German stainless precision
- Razor-sharp & dishwasher-safe
- Elegant wood block organizer

- Premium Stainless Steel Build
- Easy to Clean & Dishwasher Safe
- A Must-Have Kitchen Tool