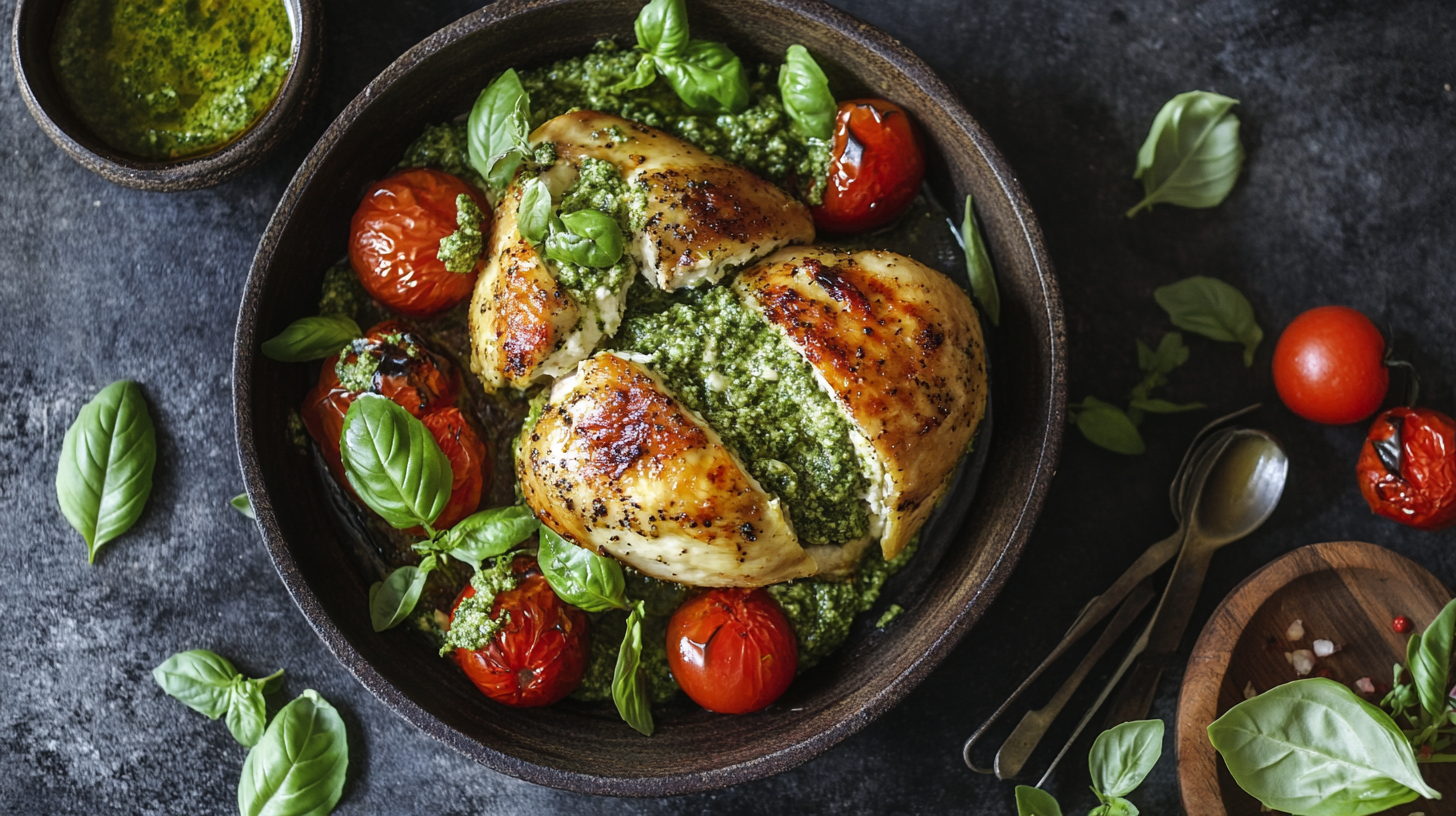
Chicken is a versatile protein that can be transformed into many delightful dishes. One such standout is the Basil Pesto and Ricotta Stuffed Chicken, a recipe that’s bursting with flavor thanks to the rich combination of basil pesto, creamy ricotta, and the savory undertone of Parmesan cheese. This dish elevates a simple chicken breast into a decadent meal that is perfect for both casual weeknight dinners and special occasions.
In this article, we’ll provide a complete, step-by-step guide on how to prepare this delicious dish. We’ll also share important details like prep time, cooking time, tips for success, nutritional information, and the benefits of incorporating these ingredients into your diet. Whether you’re a home chef looking to expand your repertoire or simply want to impress dinner guests, this recipe will surely become a favorite.
Let’s get started!
Ingredients
To make this delectable Basil Pesto and Ricotta Stuffed Chicken, you will need the following ingredients:
Main Ingredients
- 4 boneless, skinless chicken breasts
- 1/2 cup ricotta cheese
- 1/4 cup basil pesto
- 1/4 cup grated Parmesan cheese
- Salt and pepper to taste
- 2 tablespoons olive oil
These simple ingredients come together to create a dish that’s packed with flavor, yet easy enough for anyone to make.
Prep Time, Cooking Time, and Total Time
- Prep Time: 15 minutes
- Cooking Time: 30 minutes
- Total Time: 45 minutes
- Serving Size: 4 servings
- Calories per Serving: Approximately 350 kcal
Directions
Follow these easy steps to prepare your Basil Pesto and Ricotta Stuffed Chicken. Each step has been broken down to ensure that the recipe is as approachable as possible.
Step 1: Preheat the Oven
Preheat your oven to 375°F (190°C). This temperature ensures the chicken is evenly cooked, tender, and juicy. Getting the oven ready before starting the preparation saves you time and allows you to go straight to baking after searing.
Step 2: Prepare the Chicken Breasts
Start by preparing the chicken breasts. Using a sharp knife, carefully slice a pocket into each chicken breast. Be sure not to cut all the way through, as you want to create a cavity that can hold the ricotta and pesto mixture. Season each breast generously with salt and pepper.
Cutting a pocket might seem daunting if you’re not experienced, but the trick is to go slow and keep your knife parallel to the cutting board. This pocket will hold all the creamy filling and keep it inside the chicken as it cooks.
Step 3: Make the Ricotta and Pesto Filling
In a medium-sized mixing bowl, combine the ricotta cheese, basil pesto, and grated Parmesan cheese. Stir the ingredients until they are well mixed. This filling should be creamy, aromatic, and rich, with the distinct scent of fresh basil adding to its allure.
The combination of ricotta and pesto provides a smooth yet flavorful filling, while Parmesan adds a sharp, salty touch that contrasts nicely with the creaminess.
Step 4: Stuff the Chicken Breasts
Take each chicken breast and spoon a generous amount of the ricotta-pesto mixture into the pocket. Depending on the size of your chicken breasts, you may need to adjust the amount of filling to ensure that it doesn’t spill out during cooking.
Secure the opening of each chicken breast with toothpicks if necessary, which will help keep the filling inside while you sear and bake the chicken.
Step 5: Sear the Chicken Breasts
Heat 2 tablespoons of olive oil in a large oven-safe skillet over medium-high heat. Once the oil is hot, add the stuffed chicken breasts. Sear them for 3-4 minutes on each side, or until they develop a golden-brown crust. Searing the chicken first helps to lock in the juices and adds extra flavor through the Maillard reaction.
Step 6: Bake the Chicken Breasts
Once the chicken breasts have been seared, transfer the skillet to the preheated oven. Bake for 20-25 minutes, or until the internal temperature of the chicken reaches 165°F (74°C). Baking time may vary slightly depending on the size and thickness of the chicken breasts.
Baking the chicken in the oven after searing ensures that the chicken is cooked evenly and that the filling is heated all the way through. The result is juicy, tender chicken with a mouthwatering filling.
Step 7: Rest the Chicken
Once the chicken is fully cooked, remove it from the oven and let it rest for 5 minutes before serving. Resting allows the juices inside the chicken to redistribute, resulting in a moist and flavorful bite.
Step 8: Serve
Carefully remove the toothpicks from each chicken breast, then slice and serve. You can serve the Basil Pesto and Ricotta Stuffed Chicken with a side of roasted vegetables, a light salad, or even some pasta to complete the meal.
Tips for Making Basil Pesto and Ricotta Stuffed Chicken
To ensure that your dish turns out perfectly, consider these helpful tips:
- Choose the Right Chicken Breasts: Opt for larger chicken breasts that can easily hold a generous amount of filling without breaking.
- Secure the Filling: Use toothpicks to seal the edges of the chicken breasts to prevent the filling from oozing out during cooking.
- Don’t Skip the Searing Step: Searing the chicken in a skillet before baking adds a nice texture and prevents it from drying out.
- Use Fresh Ingredients: Fresh basil pesto will provide a much more vibrant flavor compared to store-bought pesto.
Benefits of Basil Pesto and Ricotta Stuffed Chicken
This dish is not only delicious but also comes with several health benefits:
- High in Protein: Chicken breast is a lean source of protein, making this dish ideal for those looking to build muscle or maintain a healthy diet.
- Rich in Calcium: Ricotta cheese is a good source of calcium, which is important for bone health.
- Healthy Fats: Olive oil and pesto provide heart-healthy fats that can help maintain cholesterol levels.
- Low Carb Option: This recipe is naturally low in carbohydrates, making it suitable for those on a low-carb diet.
Serving Suggestions
The Basil Pesto and Ricotta Stuffed Chicken can be served in various ways to complement the rich flavors of the dish:
- Over a Bed of Greens: Serve the chicken over a bed of fresh, lightly dressed greens for a simple and elegant presentation.
- With Pasta: For a more filling meal, pair the chicken with a side of pasta tossed in garlic and olive oil.
- Roasted Vegetables: Serve alongside roasted vegetables like asparagus, bell peppers, or zucchini to keep the meal light and healthy.
Frequently Asked Questions (FAQs)
Can I Make This Recipe Ahead of Time?
Yes, you can prepare the ricotta-pesto filling and stuff the chicken breasts up to a day in advance. Store them in the refrigerator until you’re ready to cook. When it’s time to serve, simply sear and bake as directed.
Can I Use a Different Cheese?
If you don’t have ricotta on hand, you can substitute with cream cheese for a similar creamy texture, though the flavor will be slightly different. Feta cheese can also be used for a more tangy flavor.
What Can I Use Instead of Pesto?
If you’re not a fan of pesto, you can use sun-dried tomato paste or a blend of fresh herbs with garlic and olive oil as an alternative filling.
How Do I Store Leftovers?
Store any leftover Basil Pesto and Ricotta Stuffed Chicken in an airtight container in the refrigerator for up to 3 days. To reheat, place it in the oven at a low temperature until warmed through.

Conclusion
Basil Pesto and Ricotta Stuffed Chicken is a versatile and flavor-packed dish that combines creamy ricotta cheese, aromatic basil pesto, and savory Parmesan in a juicy chicken breast. The result is an impressive yet easy-to-make dish that’s perfect for both casual dinners and special occasions. The combination of textures and flavors makes every bite enjoyable, and the relatively simple ingredient list means that you can make this dish with ease.
We hope this guide has provided you with everything you need to create this mouthwatering stuffed chicken recipe. From prep to serving, these steps will help you achieve a perfect result every time. Feel free to get creative with sides, and remember that the key to a great stuffed chicken is to use fresh ingredients and follow the process closely.
Give this recipe a try, and impress your friends and family with your culinary skills. Bon appétit!


